Sky-Trac Treadmill gets visual program

Got a second hand Sky-Trac treadmill. A NZ only brand imported a few years ago. Importer moved onto other things so no support but you don’t need much for a treadmill. No idea what other names these go by.
The instruction manual had a list of the in-built programs (56) typed into the manual. Needless to say not very useful as text.

So I decided to get Inkscape and some csv working together and write a litttle program to extract and graph the data in a useful way. Then print it out as a sheet to be hung on the treadmill for daily use. Maybe…

Regrettably it looks like I’ve lost the code 🙁 but here’s what I did. On page 11 of the manual is the program list. It has 56 programs. Each program has 10 steps. Each step has a speed and an incline setting.

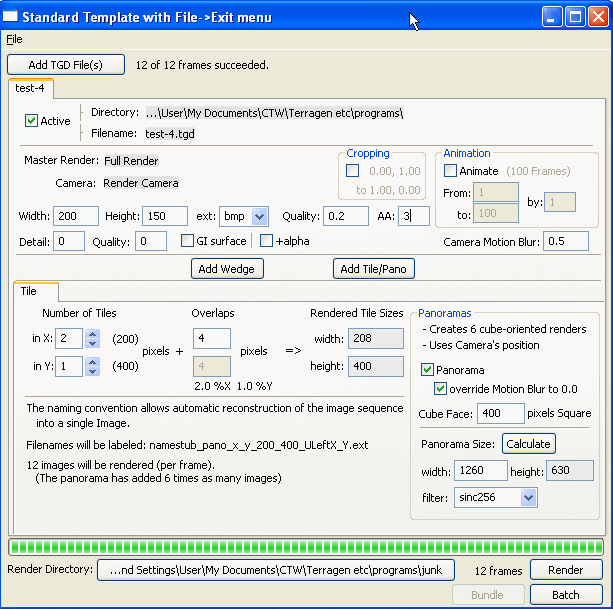
E.g. for Program 1
P01 – 4/1, 6/2, 8/3, 10/4, 10/5, 8/5, 6/4, 4/3, 6/2, 4/1

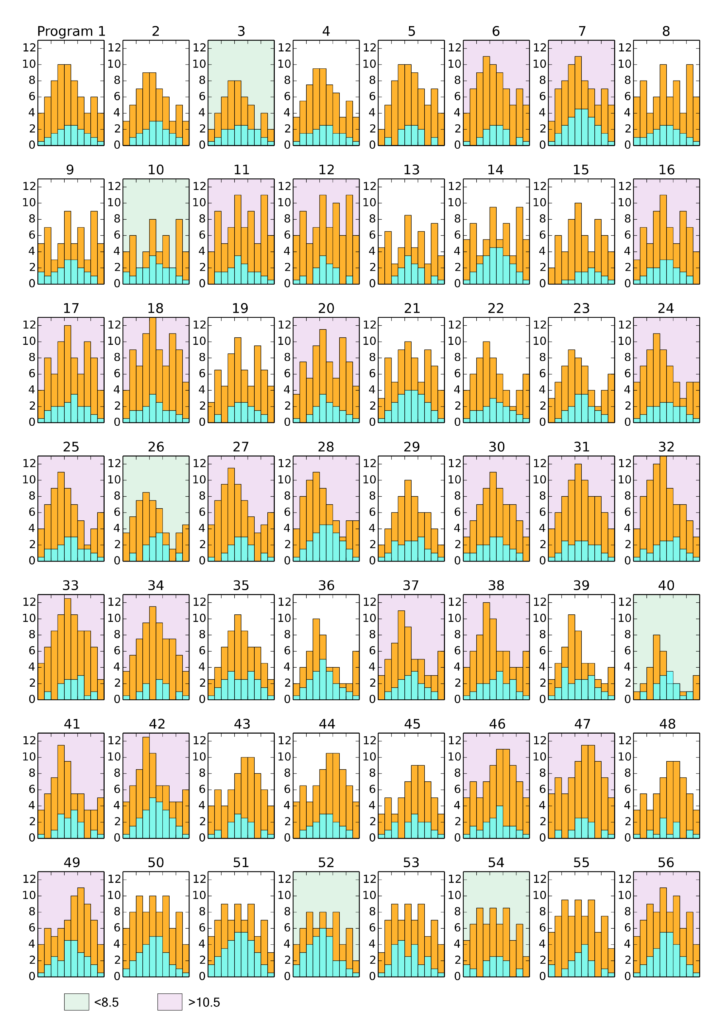
I found the min max of everything and ended up with a display like this. Which looks quite good to me and prints well with useful contrast and colour. The speed is in Orange. The incline is in Blue/Green.

Further to this I noted that there were several styles of pattern and also some programs were clearly harder than others.

So I grouped them into three styles of difficluty. Easy was green, white was average, and purple was difficult.

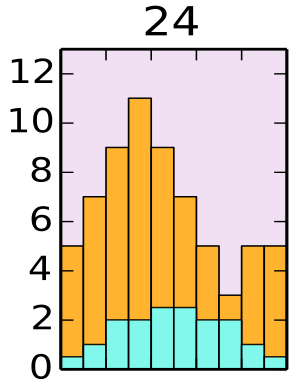
Pattern 24 was more difficult with higher intensities.

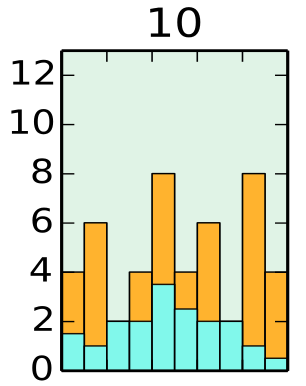
Pattern 10 was easier but also had several intervals.
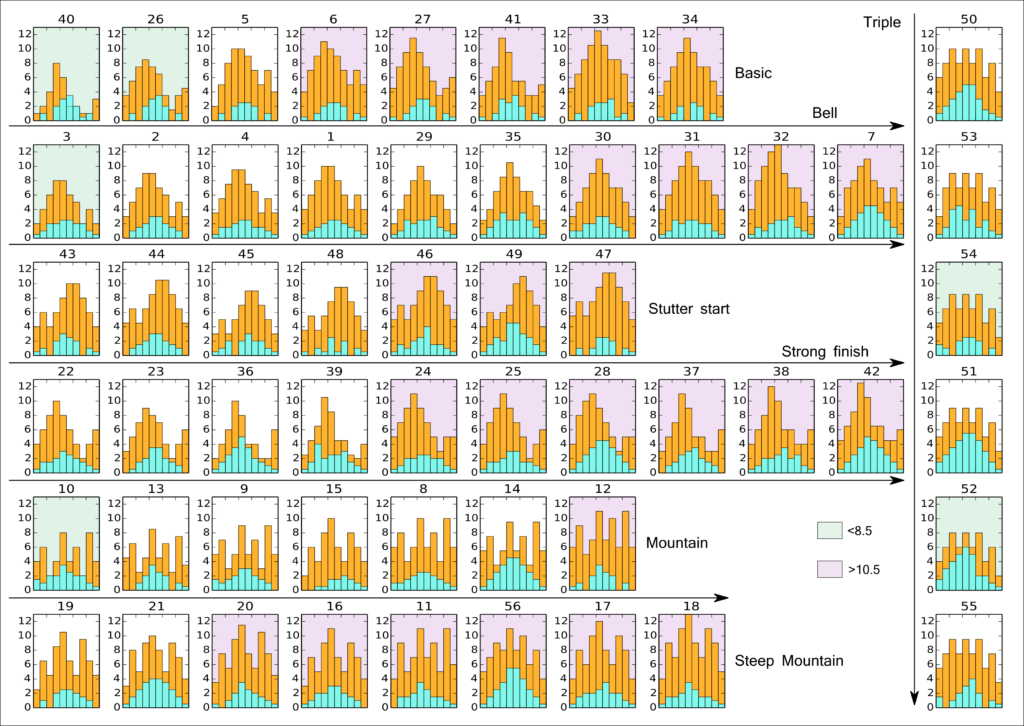
So I grouped them by style, with somewhat aritbrary labels, andthe three difficulty levels.

The final result was printed as two sheets. All the programs are on each sheet but organised in numerically increasing order (you have to select a program by incrementing or decrementing the index) and by style.

Here are ethe two sheets. If you have a SkyTrac treadmill and these programs are the same on your version, then please feel free to laminate this up and attach it to your treadmill. (Designed for A4 paper of course).

we’re back

Its been simply ages but this site is back up again.
Daz is of course miiles ahead and Daz studio plugins don’t work in the current version. Also very few free plugins for Daz anymore – all seem very commercial.

Terragen is now on version 4. So many changes in 4 years. Hard to believe ? no…

Just have to make some music posts now and I’ve also been busy with inkscape extensions.

dd-wrt and DIR-300

A friend purchased a DIR-300 D-link ADSL wireless modem surplus (common here) for use in her network as a wireless bridge. She’s connecting a solar power controller to her system and it has a webserver. But its located in the shed and it seems wireless was the best way to interrogate it from the house. http://www.dd-wrt.com/wiki/index.php/Client_Bridged

Turns out its a hard modem to flash with new firmware. There are two kinds: revision A and B.

  • type dir-300 into http://www.dd-wrt.com/site/support/router-database

Labelled on bottom of the unit. B can be fixed with a firmware update from the router’s admin menu. but A’s need a more complex set of instructions. All very well documented on the dd-wrt site here:
http://www.dd-wrt.com/wiki/index.php/DIR300

but it refers to setting up a tftp server and that looked a bit tricky. Turns out thr regular distro for tftp does not support the usage needed and you need to install tftpd-hha. I found this info and a very succinct and accurate instruction on what to do by Kr0nZ here: http://ubuntuforums.org/showthread.php?t=1996348

To simplify your search here it is:

To initially flash youll need a tftp server and the firmware files on your ubuntu machine
You can install a tftp server by typing
Code:

sudo aptitude install tftpd-hpa

then you can put your firmware files in ‘/var/lib/tftpboot’ (read the openwrt link, it will become clear why)

Same instructions basically to install PuTTY which you will use to talk to the router when flashing it.

The instructions seemed complex but were very stratightforward and 20 minutes later I had dd-wrt on my router and its all good.

Litz wire

Litz wire. I’m using it on the primaries of the new plasma drivers.
What do we need to know.

Choosing proper size:
Use simple table to choose individual wire diameter based on frequency.
10-20kHz = 33 AWG = 0.18 mm
20-50kHz = 36 AWG = 0.127 mm
50-100kHz = 38 AWG = 0.1 mm
Buy bundles of these wires with suitable coating.
Good tables and calcs available here: http://www.litzwire.com/index.htm
Also here: http://www.mwswire.com/litzsearch2.asp
Pity none of its in mm 🙁
Look up wire guages here: http://www.bulkwire.com/wiregauge.asp

Coatings:
Need a coating to deal with temp and voltage breakdown.
Formvar – good to 7kv and 105 C
polyester-imide – similar but can go to 180 C and abrasion resistant.

Soldering:
Hard to get the coating off.
Can be removed using several methods. these work:

  • with a solder pot set to 433 C. dip slowly for 8 seconds – drag across and lift to remove coating. Skim pot with cardboard to remove excess coating.
  • with NaOH bath – then washed with water and detergent to neutralise
  • stripped by mechanical abrasion with dremel and SS brush. Flip over to do other side. Clamp first to strain relieve.
  • by burning with butane torch. Clamp above strip point with metal heatsink to avoid heat strip creeping back.
    Easy coating – heat in lamp, dip in alcohol.

General info:
The r-f resistance of the coil includes the direct current resistance (ohmic resistance of the copper), and is greater than it because of skin effect and because of losses that occur in the coil materials which are located in the rapidly alternating magnetic field of the coil. The skin effect is due to the tendency of the high-frequency alternating current to flow through a comparatively thin shell of the outside surface of the wire rather than uniformly through the whole cross-section area of the copper. Since this thin outside shell has comparatively little cross-sectional, it naturally offers a higher resistance to the flow of current than would be the case if the entire cross-section area were being used. The net result on the resistance offered by the wire to the flow of current through it is precisely the same as though a smaller wire were used.

What “Litz” Wire Is

Now the d-c resistance of a coil of winding can be decreased by using larger wire (but such increase is usually restricted by limitations regarding the allowable physical size of the coil). The “skin effect” of a coil winding may be decreased by increasing the total surface area of the wire. In order to increase the surface area without increasing the cross-section of the copper used, the conductor is sub-divided into as many individual strands as is economical and practical, insulating each strand individually from the next by a thin enamel coating. Commercial wire in this form is known as “Litzendraht” (commonly called “Litz” wire). Litz wire consists of many strands of fine wire, each stand individually insulated with enamel, and the group of wires covered with some protective textile insulation such as cotton or silk (although sometimes enamel, paper or other covering is used over the group of wires).

Because the total sum of the cross-section areas of the conducting outer shells of the many individual small conductors in litz wire is greater than would be the cross-sectional area of the larger, thin conducting outer shell of a single solid wire composed of the same total amount of copper, the litz wire has a smaller skin-effect (lower “skin resistance”) than the solid wire. For this reason, it has greater high-frequency conducting efficiency and is used in r-f coil windings where higher Qs are desired.

Why Individual Strands Of Litz Wire Should Be Twisted

“Skin-effect” Losses in the conductors of which r-f and I-f coils are wound have dictated the use of Litz wire wherever economically possible. However “skin-effect” goes a step further and requires that conductor not only be subdivided into multiplicity of individually insulated strands but that these strands be arranged in such a manner that each occupies a place on the surface of the conductor an equal per cent of the time so that the total r-f current will divide equally among the many strands and thereby give the lowest effective r-f resistance. Originally, the strands in Litz wire were braided in a certain manner to get this effect. Because of price, however, modern Litz wire as used in radio receivers is merely twisted so as to bring the different strands to to the surface at different points, giving a result approaching that of braided Litz, but at far less expense. Where Litz wire is made without twisting (that is, with parallel strands) the results are inferior to twisted Litz on two counts: (1) the losses are consistently higher than for twisted Litz; (2) coils made of it exhibit greater variations in resistance than coils made from twisted Litz.

Making an animating Persona for Firefox

One of the features of Firefox is the customizable header and footer – which they call Personas.
When they first popped up I made one using a render of the Daz Studio SubDragon. I quite like it and use it as my default Persona.
Its called “DazDragon” and you have to search for it on https://www.getpersonas.com/en-US/.
Its been mildly popular and the numbers have grown slowly over a year.

However I’ve noticed a number of animating Personas and have wanted to make one for some time. Now is the day – my new machine is thrashing its 8 processor cores doing Terragen2 renders. So I figure I need to see how fast Daz Studio renders on it as well.

Some of the animating Personas are IMHO completely over the top with flashing animation designed to catch your eye. I don’t want too much distracting me at the edges of my vision but then again I want to make it move and see how it looks…

So I’m aiming for a more subtle approach based on my previous Persona which has the Dragon’s eye watching you. I figured it would be nice if it blinked – but only occasionally…
Perhaps this is going to be very annoying.. or not – we will see…

So Process:
1. The docs are here: https://www.getpersonas.com/en-US/demo_create
They are very simple ( a 3000×200 pixel image). But no mention of animating pngs.

2. Get my favourite animating png tool – I found it last year and put it aside for this. There are probably more tools than these but these are the ones I tried and worked:
– Japngeditor – Java based – https://www.reto-hoehener.ch/japng/
– If you already use the VirtualDub video editor you can use their plugin – http://sourceforge.net/projects/vdubapngmod/
– Standalone APNG ANime Maker – http://sites.google.com/site/cphktool/apng-anime-maker
I use APNG Anime Maker – It does exactly what I need.

– Turns out I’m also going to need APNG Optimizer. http://animatedpng.com/index.php/news/apng-optimizer-1-0-released/

3. Render the frames we want.
4. Assemble them in a paint program so they line up over our 3K background image.
5. Save out N images – one for each frame.
6. Use APNG Anime Maker to assemble them into an apng file
7. Optimize the APNG to make it fit the 300Kb limit for Personas.
8. Test it in a custom Persona before uploading.
9. Do it all again for a footer…
10. Upload and wait a day or two for it to be approved or denied.

1. Docs
Alas the Google documentation has some shortcomings. I doesn’t mention animated pngs in any way. Nor does it really explain that each Browser has their menu bars in diff places. So its not going to be easy to make a sophisticated looking one that fits them all. It does mention this but the psd file they supply to donwload doesn’t match my WinXP or Win7 screen layouts. YMMV. I suspect I will need to make a special one for the Mac…

3. Creating the source imagery
I used the image of my existing Persona to help me frame the render window in Daz Studio. There isn’t much room to get it all in and many of the nice aspects of the SubDragon can’t be seen. Oh well…

I made sure to grab the proper BG color for the Background. Its too hard to change this later as I use a very narrow depth of field resulting in a lot of out of focus blurring. I want a gradient on the left hand side under the menus so they are more readable.

Tweaked the SubDragon surface materials to replace all the bumps with Displacements and dial them up large. Also modified the specular map on the eye to white (no idea why its default is black because it won’t appear if its black) and move the glossiness down so we can see the supplied specular map.

Couple of side lights – red on the upper left, blue on the lower right, hoptspot for the eye. Set the camera depth of field and focus distance so the eye is in focus and everything else is getting blurry fast – test renders – Looking good.

Make up three Puppeteer settings so we can animate the eye blinking. Using just a couple of morphs. Swing the wing out of the way so we can’t see it at all.
Then make 5 renders and save them one at a time. We want the eye open, closed and a mid point which is not halfway. (Animation rules tell us that halfway will make the blink look sleepy so we want a more alert Dragon and so we make a 5/8 open frame). Also added a couple of extra renders with some more movement around the eye – maybe we will use those too..

4. Paint program
I used Ulead PhotoImpact which is now owned by Corel. Can’t work out what they intend to do with it but I upgraded to X3 and its working fine. Any paint prog will do which has layers.

Make the 3000×200 BG image and make it all the same grey as we rendered. Add a gradient which stops short of the RHS of the image where we will place the dragon renders.
I also add a Bar which will line up behind the menu items in FF on Win7 and XP. This is where you may come unstuck if using the Mac or other platform or app that uses Personas. I like the Bar, it visually separates the menu items from the links…

The image is much wider (3000 px) than needed and FF positions it, not using the LHS, but instead aligning the RHS of the image up with the RHS of the FF Browser window. As a result you need to get all your imagery positioned on the Right and whatever you put on the left will probably never be seen.
The footer works the other way and is lined up on the LHS.

Place all the images – one on each layer – and manually line them up so there is no inter-frame motion. We want just the eye to move, not the head to stutter about…

Having them in layers on the same image makes it easy to line up. The PNG maker program will also try to simplify the image by only storing differences between frames – this will make the image much smaller. By using exactly the same BG in a layered file we guarantee that each frame will be identical where it counts.

5. Save each frame out by selectively turning on layers so you have one image for each frame in the animation.

6. APNG Anime Maker (Use your tool of choice)
APNGs can have many frames. Each frame is ordered and can also have its duration set. The default is to define one delay for all frames. This is useful to get a sequence running. But I will be trying to make a number of eye movements wih a minimal number of rendered frames (to keep the size down – It must be under 300kB size) so we will set the durations of each image separately.
– Load the images using the OPEN button. Use Move Up and Down to order them. In initially set their durations to 100msec (0.1 sec) for all frames (check the All checkbox)
– Leave Offset and increment alone as we will not be moving frames around within the final image.
– Click None on Dispose – we will be overwriting each frame
– Click on Blend for Source but it doesn’t really matter for this frame replacement case.
– Set tolerance to 30 and Lossy on. Set compression to 60.
– Each time you change the order or add/remove frames – Press Optimize then Save.

You can view the end result by drag-n-dropping the resulting png file into a new Tab in Firefox.
FF will play it back for you using the settings defined in the PNG file – which will now be much larger than any single original image.

The size of the file is set by the number of frames you include and the Tolerance and Compression settings. Values from 2 to 10 are good for Tolerance. Higher numbers making lossier results and smaller files.
The larger Compression number gets the smaller the resulting file. Compression level maximum =9.
Be sure to play with these values and make your own compromise for size and quality.

I elected to repeat the sequences I made several times by cloning them and shifting them down in the ordered list. This way the same endless repetition does not occur but has variations on timing and order. The extra information about animation is very small in comparison to the image data and so you can make many smaller duplicated sections in different orders to hide the overall global loop time.
My loop ended up being about 30 seconds long – made up of 7 subsequences – total of 16 frames combined in different ways – so its harder to spot the repeat.
However the resulting filecan be very large. We need o shrink it down to fit in our 300kB limit.

7. Optimisation.
In addition to the Tolerance and Compression settings in APNG maker – we can also use the command line tool “APNG Optimizer” to reduce the file size.
When you download this archive and open it you will find a single exe file. Drag-n-Drop your png from APNG Anime Maker onto it – It will rename it, shrinking it in size, and putting it back in the same directory the original came from.

I found the program reduced my original png from 392kB to 223kB. Sneaking me in under the 300kB boundary with my additional 20kB footer (heavily jpg compressed).

The aim is to get under 300kB. I found I had to reduce my animation to 5 discrete frames ordered into 3 sequences. You can make your own Personas and not upload them and thereby avoid the 300kB limit if you like.

FYI – My final animation timings look like this:
shape 1: delay 6400ms Rrest 6 seconds
shape 2: delay 100ms blink – eye almost closed
shape 7: delay 200ms Eye opening 5/8
shape 1: delay 5000ms Rest 5 seconds
shape 7: delay 100ms eye half closed
shape 12: delay 200ms eye looking L
shape 13: delay 500ms eye extreme L
shape 1: delay 3000ms Rest 3 seconds
shape 7: delay 100ms same as above – slightly diff timing for variation
shape 12: delay 150ms
shape 13: delay 500ms
Giving me 3 sequences made up of a total of 5 different frames.

8. Testing in Firefox.
Under the menu Tools/Personas – you can select a Custom Persona (see docs in 1. for getting it on the menu)
Choose the image you have made for the header. When you make a footer you can select it here too.
Doing this shows you the Persona as though you had loaded it from the Web.

9. The Footer
Same rules apply but I kept mine a simple jpg with very high (50%) compression to keep the size as small as possible so I would have more room in my 300kB for the animating header.
(Its the SubDragon head from the other side…)

10. Submitting.
Go here: https://www.getpersonas.com/en-US/upload
– and agree to the terms of service – after reading them of course…
– choose whether you want to allow other people to share your design.
– upload the images and set the colors when asked.
Wait…. posisbly for a couple of days… I guess they examine them by hand looking for DMCA violations and other TOS breaking activities…

Done:
You can find this one on Personas by searching for “DazDragon2 animated” or going here:
https://www.getpersonas.com/en-US/gallery/Designer/Neon22

TGD Batch for Terragen 2 – V7

Had an idea to make a community renderfarm system for Terragen 2.
I already have the TGD_Batch program and if I refactor it right, then it seems like a good start.
Renaming it to Batch_TG2 seems like a good idea. Maybe there is a better name to use…?

SO this is the refactor – later there will be the server to manage the community farm.

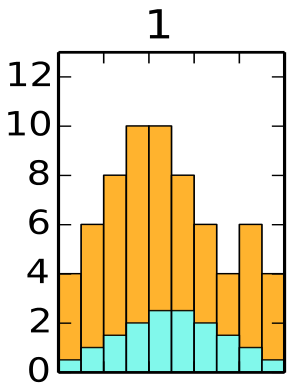
It lets you:
– Break up a large image into smaller tiles for spreading the render load
– Create Panorama images in Equirectangular projection for reflection and environment maps.
– Blend between values of parameters to create wedges. Makes single, two and three axis blends. Annotates these images and montage into grids so they can be easily understood.

You need to have a licensed copy of Terragen2 for the commandline version to work. This will not work on the free version.

What’s happened is:
– The older Pythoncard UI has been swapped out for a more modern QT based UI.
– General refactoring and cleanup has occurred especially the cruft to support notebooks in pythonCard (which did not work that well) has been removed.
– A render thread has been added so the UI doesn’t block when it goes off to render locally
– All renders are processed in two passes
– one gathers them all into a new Task class containing individual RenderActions for each and every image
– the second renders each image (RenderAction) one at a time.
– When its later extended to send Renderactions to the farm – they can be split up
– All scripts to recombine now work on these finished frames, once they all come in.
– Logging, guestimating finish times, and tracking of progress has all been added
– some refinements like; triaxial blends (interp 3 parameters at the same time) and allowing loading of the same TGD file several times with different settings, have been added.

The QT is a really nice and simple UI to build with. I am very pleased its so stable now. Also using Pyside as the python binding.

The following packages are needed to make it work:
– Pyside – the python wrapper for QT. downloading Pyside automatically brings in the QT dlls so this is all you need for the UI
– psutil – a simple Python module which is used when cancelling a render to kill the tgdcli process.
– Hugin – a very cool Panorama making program. We only use Nona.exe to stitch the panoramas together but its worth downloading the entire app, its so good.
http://hugin.sourceforge.net/
– Imagemagick – a commandline based image processing tool. It does the clipping, annotating and creates montages.

So here it is..

Installation:
– no clever installer instead you have to follow these simple instructions:

1. Choose 32 or 64 bit. Tested with 32bit winxp SP3 and 64bit Win7.
– IT IS CRITICAL that you choose the right packages below so they all match.
– if you choose 64bit you MUST choose python 2.7 (psutil is only available in 64bit Python 2.7)

2. Choose python 2.6 or 2.7 (not 3.0)
– if you already have Python 2.6 on your system. Then use it. Else 2.7 is recomended.
– Either will work on 32bit. You MUST choose 2.7 if you have a 64bit system

3. Download the following
– make sure to only get the proper version (2.6, or 2.7, and 32 or 64bit when downloading)
– Pyside
http://developer.qt.nokia.com/wiki/PySide_Binaries_Windows

– Psutil
http://code.google.com/p/psutil/downloads/list

– Hugin
32bit —- http://sourceforge.net/projects/hugin/files/hugin/hugin-2011.0/HuginSetu…
64bit —- http://sourceforge.net/projects/hugin/files/hugin/hugin-2011.0/HuginSetu…

– Imagemagick
http://www.imagemagick.org/script/binary-releases.php#windows
– 16 bit versions of Imagemagick supposedly support OpenEXR but cannot find a binary with it built in.
– This is unfortunate because if there was one – we could make EXR panoramas for HDRI lighting use in other programs.

If we had Ham, we could have Ham and Eggs.. if we had eggs….

4. Install them. Only critical order is Python first.

5. unzip the Batch_TG2 archive into a handy folder you make somewhere and put a shortcut to Batch_TG2.py on your desktop.

6. Test by running Batch_TG2.py
– Double click should work.
Choose a simpe TGD to start with so renders are short. You can override the width, height to 200,150 and lower the Quality to 0.1 for fast test renders.

Try to break it…
Tell me about the breaks…

http://forums.planetside.co.uk/index.php?topic=12769

Instructions:
I’m hoping the layout is self evident…..?
– Organise Tab is where you load and setup what you want to do.
– Render Tab is where you go to Render
– “Render Farm” and “Render Local” do the same thing right now…. Get used to using “Render Farm” 🙂

Batch_TG2-small

TGD Batch for Terragen 2 – V4

Here is a program to help automate the rendering of several aspects of Terragen 2 files.
Terragen 2 is a program from Planetside that renders very realistic outdoor naturalistic imagery.
The announcement and discussion about this app is here:
http://forums.planetside.co.uk/index.php?topic=5251.msg54258#msg54258

It will only work for purchased versions of TG2 as it requires the command line option to work.

This is Version 4. The previous versions are on the Planetside forums. Here: http://forums.planetside.co.uk/index.php?topic=2816.0

Features:
– Creation of panoramas (6 auto views with tiling)
– Tiled renders for very large images (with overlaps)
– batch renders for remote rendering (but no Renderfarm Manager)
– wedge tests for all parameters in TGD files
– tested in version 1.10.23.1
– renders animations one frame at a time (to facilitate remote batch rendering)

Please fell free to make suggestions for improvements of any kind.

Panoramas
– are generated using Nona – part of the Hugin project (which replaces PTStitcher with an opensource alternative)
– an Imagemagick script recombines all rendered views into a single image and Nona turns it into an equirectangular projection ready for Quicktime or Environment maps
– currently does not work for the HDRI EXR format because Imagemagick needs a custom compile.
However – using new version of hugin, manually with the 6 images, will create the EXR end result.

Big Ben supplied an excellent workflow and scripts using PTStitcher which I have learnt a lot from.
http://forums.planetside.co.uk/index.php?topic=853.0
http://forums.planetside.co.uk/index.php?topic=972.0
Thanks BigBen.

Tiled rendering:
– has overlaps to help deal with the GI problems and to ensure that antialiasing does not create edge artifacts.
– I use Imagemagick scripts to recombine the tiles into a single image.
– these scripts are automatically generated.
– the individual frames are well named for manual identification

Wedge Tests:
– Blends can be one dimensional or two dimensional
– The resulting images will be grouped into a single image grid
– the user can control the shape of the grid for one dimensional blends
– all blends are labeled with their parameters and values

Installing
Alas – I have not packaged it up in an installer. sorry about that 🙁
You need to load (in this order):
– Python (2.5.2 or 2.6)
– wxPython (version based on your version of Python)
– Pythoncard
– Imagemagick
– Hugin – if you want Panoramas (tested in 0.7 beta4 and release 0.7.0)

I built it using stable features of python 2.5.2 and wxpython 2.8
Later versions should work. Earlier versions may not. (You must not use wxpython 2.6 – notebook is faulty)

Get Python from http://www.python.org/download/
choose the latest . I tested in 2.5.2 and 2.6
Get wxpython from: http://www.wxpython.org/download.php#binaries
Use a matching installer for your version of Python
Get Hugin from: http://hugin.sourceforge.net/download/
we only use Nona (replaces PTStitcher for panoramas) but its all bundled together.
Get Imagemagick from http://www.imagemagick.org/script/binary-releases.php#windows
the 16bit version does not support exr 🙁 so choose either the 16bit or 8bit windows version
Get PythonCard 0.8.2 from http://pythoncard.sourceforge.net/
– Specifically download from: http://sourceforge.net/project/showfiles.php?group_id=19015
– Installation Instructions (seven steps including dependent packages) are here:
http://pythoncard.sourceforge.net/windows_installation.html

Install Python
Install wxpython
Install Pythoncard
Install Imagemagick
Install (just unpack really) Hugin
– see where Nona is located and manually enter its proper location into the top of Batch_TG2.py
– the location is defined in a global variable at the head of the file

Operation:
Once PythonCard is installed.
– Unzip the attached zipfile into any directory you like.
– Double click on the file Batch_TG2.py

It will open a dialog prompting you to select a TGD file (or files).
You may deactivate ones you do not wish to render.
Adding a Tile will allow you to tile or make a panorama
Scripts will be made that will composite the tiles into a single image.
– Scripts will be named _recombine.bat
Panoramas will create the recombine scripts, as well as a script that calls them all and create an Equirectangular mapped image for a panorama.
(Quicktime style but equally useful for environment maps)
– Scripts will be named _Collate_and_Build_Pano.bat
Panoramas can be viewed directly in panoglview (part of hugin install)

The log window will show you progress output from TGD as it runs in the background.
Animation is done by repeatedly opening the file and rendering single frames
(see http://forums.planetside.co.uk/index.php?topic=954.0)

You can edit:
– size of image, quality settings, antialiasing, GI Settings, motion blur
– if animating – range, step-size
– many key settings – see screenshot

The program will make a temporary copy of your tgd file so as not to modify your original. It will prefix all these new TGD files with the prefix “tmp” so they are easy to find and delete after rendering.

Choose a rendering destination directory to collect frames – then render.
To recombine the tiles – run the script: _recombine.bat (It will be in the image directory)
To recombine tiles and build a panorama – run the script: _Collate_and_Build_Pano.bat
Your original rendered images will not be edited or deleted.
Your original tgd files will not be edited or deleted.
You will have to remove the surplus files manually (its just safer this way and they are well named)

Using “Batch” instead of “Render” will create the files to run – but not execute them.

Summary:
I find it useful for:
– doing wedge tests (blends) of parameter ranges
– making up a batch of renders to run overnight (locally or on remote machines),
– setting off long animation sequences,
– making tiled renders for really large images (not HDR yet),
– Panoramas (not hdr yet)
Your original tgd files will not be edited or deleted.

User mods:
You may wish to change the default starting directory.
– Its defined at the head of the file: Batch_TG2.py
You may wish to change the “tmp” prefix for temporary TGD files.
– Its defined at the head of the file: Batch_TG2_class.py
You will want to set the default location of the Nona.exe (if you make Panoramas)
– Its defined at the head of the file: Batch_TG2.py

Next version may
– support HDR options for panoramas and tiled images
– bundle all referenced files into a zip file for easy remote rendering
I need help (see about box) to get a version of Imagemagick compiled with OpenEXR support. Any takers ?
If we can do that then I will alter it to make HDR panos and tiled images

Inkscape – making an extension (plug-in)

I’ve been making some extensions in Inkscape recently and learned some things.
So here’s the first in a series about making an extension to help creating files for the Ponoko laser cutting service.

What we want is to make it easy to set the line color and style for the various kinds of Laser lines ponoko supports.
E.g. cutting line is blue and 0.1mm in width. Heavy Vector lines are red.

Its fairly easy to do it all manually but then sometimes you forget to set the line width or to check that every single line is the right “color”.

So it would be useful to have a couple of tools to help:
Validate:
1. check that all paths have one of the legal colours and have the right stroke width.
2. check all are paths and no text etc – prompt if there is.

Working:
1. set the selected paths to be one of the legal colors (7 of them, 8 including comment)
2. toggle the line widths between the proper width and a larger width.
This tool is useful when you work on the larger sheets – the lines are so small that when zoomed out the entire drawing looks blank.

So we are going to make several posts showing how to get this done.

Kaossilator – I have one

The Korg Kaossilator and mini-KP are very cool little gadgets. I have a couple and I intend modifying them to make something even more useful.

Modding the Kaossilator:
Externalize the buttons using the spare room at the top – including videos.
http://kaossilator.wordpress.com/
Great internal pics of the Kaossilator in high res also on his site.

Using that Mod:
and here’s a guy (James Haskin) who has done the mod and has used the 4 buttons on a Guitar Hero controller to make a very cool hack 🙂
http://www.youtube.com/watch?v=Lns8Sf5e-2Q

Add a Grid to the pad:
http://kgridmod.blogspot.com/
Very useful to get repeatable performances