Here is a program to help automate the rendering of several aspects of Terragen 2 files.
Terragen 2 is a program from Planetside that renders very realistic outdoor naturalistic imagery.
The announcement and discussion about this app is here:
http://forums.planetside.co.uk/index.php?topic=5251.msg54258#msg54258
It will only work for purchased versions of TG2 as it requires the command line option to work.
This is Version 4. The previous versions are on the Planetside forums. Here: http://forums.planetside.co.uk/index.php?topic=2816.0
Features:
– Creation of panoramas (6 auto views with tiling)
– Tiled renders for very large images (with overlaps)
– batch renders for remote rendering (but no Renderfarm Manager)
– wedge tests for all parameters in TGD files
– tested in version 1.10.23.1
– renders animations one frame at a time (to facilitate remote batch rendering)
Please fell free to make suggestions for improvements of any kind.
Panoramas
– are generated using Nona – part of the Hugin project (which replaces PTStitcher with an opensource alternative)
– an Imagemagick script recombines all rendered views into a single image and Nona turns it into an equirectangular projection ready for Quicktime or Environment maps
– currently does not work for the HDRI EXR format because Imagemagick needs a custom compile.
However – using new version of hugin, manually with the 6 images, will create the EXR end result.
Big Ben supplied an excellent workflow and scripts using PTStitcher which I have learnt a lot from.
http://forums.planetside.co.uk/index.php?topic=853.0
http://forums.planetside.co.uk/index.php?topic=972.0
Thanks BigBen.
Tiled rendering:
– has overlaps to help deal with the GI problems and to ensure that antialiasing does not create edge artifacts.
– I use Imagemagick scripts to recombine the tiles into a single image.
– these scripts are automatically generated.
– the individual frames are well named for manual identification
Wedge Tests:
– Blends can be one dimensional or two dimensional
– The resulting images will be grouped into a single image grid
– the user can control the shape of the grid for one dimensional blends
– all blends are labeled with their parameters and values
Installing
Alas – I have not packaged it up in an installer. sorry about that 🙁
You need to load (in this order):
– Python (2.5.2 or 2.6)
– wxPython (version based on your version of Python)
– Pythoncard
– Imagemagick
– Hugin – if you want Panoramas (tested in 0.7 beta4 and release 0.7.0)
I built it using stable features of python 2.5.2 and wxpython 2.8
Later versions should work. Earlier versions may not. (You must not use wxpython 2.6 – notebook is faulty)
Get Python from http://www.python.org/download/
choose the latest . I tested in 2.5.2 and 2.6
Get wxpython from: http://www.wxpython.org/download.php#binaries
Use a matching installer for your version of Python
Get Hugin from: http://hugin.sourceforge.net/download/
we only use Nona (replaces PTStitcher for panoramas) but its all bundled together.
Get Imagemagick from http://www.imagemagick.org/script/binary-releases.php#windows
the 16bit version does not support exr 🙁 so choose either the 16bit or 8bit windows version
Get PythonCard 0.8.2 from http://pythoncard.sourceforge.net/
– Specifically download from: http://sourceforge.net/project/showfiles.php?group_id=19015
– Installation Instructions (seven steps including dependent packages) are here:
http://pythoncard.sourceforge.net/windows_installation.html
Install Python
Install wxpython
Install Pythoncard
Install Imagemagick
Install (just unpack really) Hugin
– see where Nona is located and manually enter its proper location into the top of Batch_TG2.py
– the location is defined in a global variable at the head of the file
Operation:
Once PythonCard is installed.
– Unzip the attached zipfile into any directory you like.
– Double click on the file Batch_TG2.py
It will open a dialog prompting you to select a TGD file (or files).
You may deactivate ones you do not wish to render.
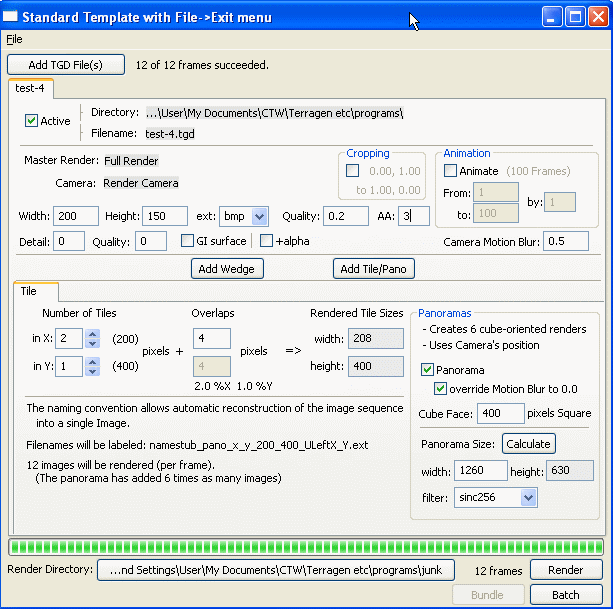
Adding a Tile will allow you to tile or make a panorama
Scripts will be made that will composite the tiles into a single image.
– Scripts will be named _recombine.bat
Panoramas will create the recombine scripts, as well as a script that calls them all and create an Equirectangular mapped image for a panorama.
(Quicktime style but equally useful for environment maps)
– Scripts will be named _Collate_and_Build_Pano.bat
Panoramas can be viewed directly in panoglview (part of hugin install)
The log window will show you progress output from TGD as it runs in the background.
Animation is done by repeatedly opening the file and rendering single frames
(see http://forums.planetside.co.uk/index.php?topic=954.0)
You can edit:
– size of image, quality settings, antialiasing, GI Settings, motion blur
– if animating – range, step-size
– many key settings – see screenshot
The program will make a temporary copy of your tgd file so as not to modify your original. It will prefix all these new TGD files with the prefix “tmp” so they are easy to find and delete after rendering.
Choose a rendering destination directory to collect frames – then render.
To recombine the tiles – run the script: _recombine.bat (It will be in the image directory)
To recombine tiles and build a panorama – run the script: _Collate_and_Build_Pano.bat
Your original rendered images will not be edited or deleted.
Your original tgd files will not be edited or deleted.
You will have to remove the surplus files manually (its just safer this way and they are well named)
Using “Batch” instead of “Render” will create the files to run – but not execute them.
Summary:
I find it useful for:
– doing wedge tests (blends) of parameter ranges
– making up a batch of renders to run overnight (locally or on remote machines),
– setting off long animation sequences,
– making tiled renders for really large images (not HDR yet),
– Panoramas (not hdr yet)
Your original tgd files will not be edited or deleted.
User mods:
You may wish to change the default starting directory.
– Its defined at the head of the file: Batch_TG2.py
You may wish to change the “tmp” prefix for temporary TGD files.
– Its defined at the head of the file: Batch_TG2_class.py
You will want to set the default location of the Nona.exe (if you make Panoramas)
– Its defined at the head of the file: Batch_TG2.py
Next version may
– support HDR options for panoramas and tiled images
– bundle all referenced files into a zip file for easy remote rendering
I need help (see about box) to get a version of Imagemagick compiled with OpenEXR support. Any takers ?
If we can do that then I will alter it to make HDR panos and tiled images